

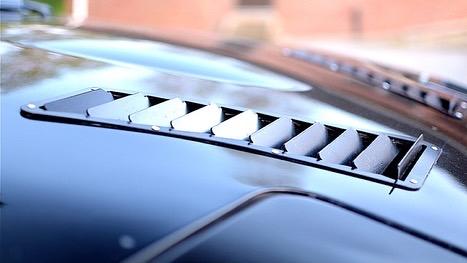
Miata Hood Louver Installation
Thank you for choosing Spiked Performance!
This Hood Louver kit is a DIY product, and although cutting into your car can be scary, it's a fairly simple job. Just remember to take your time, and cut with the most precision possible. We are not responsible for any damage to your vehicle or this product during the installation process or after. If you do not feel comfortable, please consider professional assembly.
***New V2 Louvers use same location as previous vents, pictures will be updated soon!***
Your Spiked Performance Hood Louver kit includes:
- Hood Louver set
- 1/8th Rivets
- Vinyl Cut template
Tools needed:
- Icy cold beverage
- Cutting tools-
- Angle Grinder
- Dremel with cutting discs and drum sanders
- Drill & 1/8″ drill bit
- Rivet Gun
- Scissors
- Masking tape
- Measuring tape
- Basic metric socket set
Make sure to wear protective equipment! Long sleeve shirt, eye protection, and ear protection are all recommended!
Check out this video from Zitro Racing, but make sure to view the written instructions for details!
Step 1: Remove Hood
Although this is not necessary, it only takes a minute and will make the job much easier and cleaner. 14mm socket to remove the 2 bolts per side. Set the hood on saw horses, or use a couple of boxes like I did.
Step 2: Install Cut Template (NA Miata)
From the front of the hood, measure 200mm straight back and mark it. Do this on both sides of the hood, as close to the edge as possible.
Run a piece or masking tape straight across the hood, under the marks connecting them together. This will create a straight line across the hood. Again, the 200mm mark should be on top of the tape, closest to the windshield.
On each side of the tape, measure 90mm in, and mark the tape.
Now it's time to install the template. This is a big sticker, so it's difficult to install without a wrinkle or bubble. The best way to be sure it's done right is by using a vinyl applicator liquid, or baby soap/water.
Spray the surface with the vinyl applicator liquid. The outer edge at the 90mm mark, and the bottom edge resting evenly over the masking tape. Use a squeegee or a credit card to smooth out the template and run the application fluid out from under the template. Give it a minute to dry, and peel the transfer tape.

Step 2: Install Cut Template (NB Miata)
From the edge of the front of the hood(behind the headlight cutout, measure 75mm straight back and mark it. Do this on both sides of the hood, as close to the edge as possible.
Run a piece or masking tape straight across the hood, under the marks connecting them together. This will create a straight line across the hood. Again, the 75mm mark should be on top of the tape, closest to the windshield.
On each side of the tape, measure 290mm in, and mark the tape.
Now it's time to install the template. This is a big sticker, so it's difficult to install without a wrinkle or bubble. The best way to be sure it's done right is by using a vinyl applicator liquid, or baby soap/water.
Spray the surface with the vinyl applicator liquid. Apply 1 template at a time, with the outer edge at the 290mm mark, and the bottom edge resting evenly over the masking tape. Use a squeegee or a credit card to smooth out the template and run the application fluid out from under the template. Give it a minute to dry, and peel the transfer tape.

Step 3: Protect the Paint
Tape some newspaper or whatever you have handy to cover all areas of the hood you aren't cutting. You can also go crazy and just cover everything in masking tape.

Step 4: Cut the top layer
I prefer the precision of a Dremel for this, but be prepared to go through some blades. I went through 13, but they came out of a $5 pack of 20 I bought on Amazon. You can also use your angle grinder, just go slowly so the paint does not overheat.
Warning: Take your time. Do this in sections, and give your hood a chance to cool between cuts. If it over heats you'll melt the vinyl, and it can start to damage your paint.
This is a good time to sip your icy cold beverage between cuts.

Step 5: Cutting the Bottom Layer
Flip the hood over, and you should be able to see the holes you cut out on top.
Using your angle grinder, cut out the bracing blocking the opening.
Slide the louver into place and fine trim any area that's contacting. This is a great time to clean up the edges with the drum sander Dremel bits.
**The NB is much easier to do for this step, you'll see NB people!**
Step 6: Drill the 12 mounting holes
Start by only drilling one hole. Then place the louver on the hood, and stick a rivet in the hole to hold it in place. *Do not actually install the rivet, you are just placing it in the hole.
Line up a hole on the opposite end. Example; you drilled the bottom left hole, so line up the top right.
Drill through the louver and the hood together. Now stick a rivet in this hole to hold the louver in place.
Drill the remaining 4 holes through the Louver an hood together. This insures perfect alignment.

You can see my cuts aren't perfect. That's okay, the louvers will cover any imperfections.
Step 7: Install the Pop Rivets
This step is self explanatory. Use your rivet gun to install the 12 rivets. If you don't have a rivet gun, you can order one for about $20 on Amazon.
Step 8: Install the Hood
Only snug the bolts, then line up the hood. Tighten the bolts fully when hood is aligned.


That's it! Congratulations on your new hood louvers!
Email us hello@spikedperformance.com if you have any questions.